고정 헤더 영역
상세 컨텐츠
본문
1. 조명 합성 : Paint by Example(diffusion model) 활용
GitHub - Fantasy-Studio/Paint-by-Example: Paint by Example: Exemplar-based Image Editing with Diffusion Models
Paint by Example: Exemplar-based Image Editing with Diffusion Models - Fantasy-Studio/Paint-by-Example
github.com
[2211.13227] Paint by Example: Exemplar-based Image Editing with Diffusion Models
Paint by Example: Exemplar-based Image Editing with Diffusion Models
Language-guided image editing has achieved great success recently. In this paper, for the first time, we investigate exemplar-guided image editing for more precise control. We achieve this goal by leveraging self-supervised training to disentangle and re-o
arxiv.org
-논문 내용 :

-결과(scale 10으로 설정) :


2. 조명 효과 적용 : mask 생성
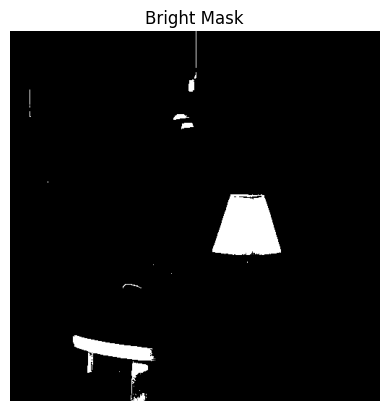
2-1. mask 생성 단계 (1)
=>밝기 임계값 기준
=>문제점 : 조명 외에 밝은 부분까지 포함됨
2-2. mask 생성 단계 (2)
=>원본 이미지와의 차이 활용
=>mask 내부 채움

2-3. mask 생성 단계 (3)
=>앞선 두 단계의 공통 부분을 최종 mask로 생성

2-4. 밝기 및 색온도 조절


3. 코드
import cv2
import numpy as np
import matplotlib.pyplot as plt

# 이미지 읽어오기
imageA_path = './img/10_449_4_321 (3).png'  # 조명 생성된 인테리어 이미지
imageB_path = './img/10_449_4.png'  # 초기에 입력한 인테리어 이미지
imageA = cv2.imread(imageA_path)
imageB = cv2.imread(imageB_path)
grayA = cv2.cvtColor(imageA, cv2.COLOR_BGR2GRAY)
grayB = cv2.cvtColor(imageB, cv2.COLOR_BGR2GRAY)

# --- 첫 번째 mask : Flood Filled + Combined Mask ---
# SSIM 계산
from skimage.metrics import structural_similarity as compare_ssim
(score, diff) = compare_ssim(grayA, grayB, full=True)
diff = (diff * 255).astype("uint8")

# Threshold and Flood Fill
_, thresh = cv2.threshold(diff, 0, 255, cv2.THRESH_BINARY_INV | cv2.THRESH_OTSU)
flood_filled = thresh.copy()
h, w = flood_filled.shape[:2]
flood_fill_mask = np.zeros((h + 2, w + 2), dtype=np.uint8)
cv2.floodFill(flood_filled, flood_fill_mask, (0, 0), 255)
flood_filled_inverted = cv2.bitwise_not(flood_filled)
combined_filled = cv2.bitwise_or(thresh, flood_filled_inverted)

# --- 두 번째 코드: 밝기 기준 ---
image = cv2.imread(imageA_path)
gray_image = cv2.cvtColor(image, cv2.COLOR_BGR2GRAY)
_, bright_mask = cv2.threshold(gray_image, 220, 255, cv2.THRESH_BINARY)

# --- 결과 : 공통 마스크 생성 ---
common_mask = cv2.bitwise_and(combined_filled, bright_mask)

# 마스크 부드럽게 처리 (Gaussian Blur)
blurred_mask = cv2.GaussianBlur(common_mask, (51, 51), 0)

# 마스크를 [0, 1] 범위로 정규화
normalized_mask = blurred_mask / 255.0

plt.figure(figsize=(15, 5))  # 한 줄에 표시할 경우 높이를 줄임
# 공통 mask
plt.subplot(1, 3, 1)
plt.title("common mask")
plt.imshow(common_mask, cmap='gray')
plt.axis('off')

# 밝기 mask
plt.subplot(1, 3, 2)
plt.title("bright mask")
plt.imshow(bright_mask, cmap='gray')
plt.axis('off')

# 원본/합성 이미지 차이 mask
plt.subplot(1, 3, 3)
plt.title("combined_filled")
plt.imshow(combined_filled, cmap='gray')
plt.axis('off')

# 트랙바 콜백 함수 정의
def update_image(val):
    # 밝기 및 색온도 조절 값 가져오기
    brightness_factor = cv2.getTrackbarPos('Brightness', 'Adjustments') / 10.0  # 밝기 (1.0 ~ 2.0)
    color_temp = cv2.getTrackbarPos('Color Temp', 'Adjustments') - 50  # 색온도 조절 (-50 ~ +50)

    # 원본 이미지 복사하여 조정 작업 수행
    updated_image = image.astype(np.float32)

    # 밝기 조절 (마스크된 밝은 부분만)
    for i in range(3):  # B, G, R 채널에 대해 반복
        updated_image[:, :, i] = updated_image[:, :, i] * (1 + normalized_mask * (brightness_factor - 1))

    # 색온도 조절
    updated_image[:, :, 0] += normalized_mask * color_temp  # 파란색 채널 조절 (더 차갑게)
    updated_image[:, :, 2] -= normalized_mask * color_temp  # 빨간색 채널 조절 (더 따뜻하게)

    # 값 클리핑 및 uint8 형변환
    updated_image = np.clip(updated_image, 0, 255).astype(np.uint8)

    # 조정된 이미지 표시
    cv2.imshow('Adjustments', updated_image)

# 윈도우 생성
cv2.namedWindow('Adjustments')

# 트랙바 생성 (밝기 및 색온도 조절)
cv2.createTrackbar('Brightness', 'Adjustments', 10, 20, update_image)  # 밝기 (1.0 ~ 2.0)
cv2.createTrackbar('Color Temp', 'Adjustments', 50, 100, update_image)  # 색온도 (-50 ~ +50)

# 초기 이미지 업데이트 호출
update_image(0)

# 사용자 입력 대기
cv2.waitKey(0)
cv2.destroyAllWindows()'지능정보 sw 아카데미' 카테고리의 다른 글
| 이미지 합성 _ diffusion 모델 사용하기 (0) | 2024.11.24 |
|---|


댓글 영역